📌 Why Vertical Video Editing Matters in 2025
With the rise of platforms like Instagram Reels, YouTube Shorts, Facebook Stories, and TikTok, vertical video has become a dominant format. But if you’re using a professional editing tool like EDIUS 11, you might be wondering: How do I create vertical (9:16) videos without cropping or distortion?
This tutorial blog—will walk you through how to:
-
Set up a vertical (1080×1920) project in EDIUS
-
Edit vertical content shot on mobile phones
-
Add transitions and effects correctly in portrait mode
-
Export vertical videos without black bars
- There are various type of ready to use projects & templates for edius 10, edius 11
- Reel Wedding Teaser, Reel Wedding Trailer, Reel Wedding Stories
🛠️ Step-by-Step Guide: Editing Vertical Videos in EDIUS 11
✅ Step 1: Create a New Project
-
Open EDIUS 11
-
Click on “New Project”
-
In the Project Settings window:
-
Frame Size:
1080 x 1920(This is the vertical 9:16 aspect ratio) -
Frame Rate: Choose based on your source (e.g., 25p, 30p)
-
Field Order: Progressive
-
Aspect Ratio: 9:16
-
Name the project something like “VerticalVideo_Project”
-
💡 Pro Tip: If your footage is 4K vertical (like 2160×3840), set the resolution accordingly.
🎞️ Step 2: Import Vertical Footage
-
Drag & drop your vertical mobile video (shot in portrait mode)
-
EDIUS will prompt if you want to match the clip settings—choose No, as we’ve already created a vertical timeline.
✂️ Step 3: Place and Adjust Clips
-
Drag your clip onto the timeline.
-
If it appears zoomed or cropped, right-click → Layouter → Scale and Center the video correctly.
-
Use “Layouter Tool” for fine adjustments (scale, position, rotation).
🔧 Adjust clips to fit perfectly within 9:16 to avoid black borders or letterboxing.
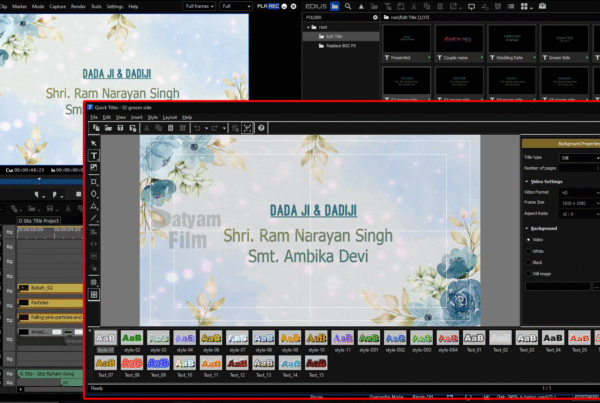
✨ Step 4: Add Titles, Effects, and Transitions in Portrait Mode
-
Use Title Tool to create vertical-aligned text. Make sure your text is centered within the 1080×1920 area.
-
Add transitions as you normally would, but make sure you preview the vertical alignment.
-
Use EDIUS 11’s GPU-accelerated effects that work well with vertical resolution (e.g., blur background, dynamic zoom).
🔊 Step 5: Audio & Voice-overs
-
Add background music or narration.
-
Use AI Audio Noise Removal for clean voiceovers (optional but recommended for reels/shorts).
📤 Step 6: Export Settings for Vertical Videos
-
Click Export > Print to File
-
Select H.264 or H.265 MP4 format
-
In Advanced Settings:
-
Resolution:
1080 x 1920 -
Bitrate: 10,000–16,000 kbps for HD, 20,000+ for 4K
-
Frame Rate: Match source (30p or 25p)
-
-
Check “Use Hardware Encoding” if your GPU supports NVENC or VCE
✅ Final output will be compatible with Instagram, YouTube Shorts, and other platforms.
🔍 Common Problems & Fixes
| Issue | Cause | Fix |
|---|---|---|
| Black bars appear | Wrong project resolution | Set project to 1080×1920 or match source |
| Video looks stretched | Clip not scaled properly | Use Layout tool to adjust manually |
| Exported video appears sideways | Metadata error | Ensure correct rotation and frame size in export |
📲 Where You Can Use These Vertical Videos
-
Instagram Reels (max 90 seconds)
-
YouTube Shorts (under 60 seconds)
-
Facebook Stories
-
Snapchat
-
TikTok
-
Mobile-first advertisements
📚 Additional Tips
-
Always shoot in portrait mode with phone lock to prevent metadata rotation issues.
-
For professional Reels or Shorts, keep your duration under 60 seconds.
-
Use safe title margins so your text doesn’t get cropped on small screens.
✅ Conclusion
Editing vertical videos in EDIUS 11 is not only possible—it’s powerful. With the right setup, you can create high-quality portrait-mode content perfect for today’s mobile-first platforms. Just follow the correct project settings, adjust layout properly, and export using optimized presets for social media.
Want to try it; book now edius 11 software available at very best price on www.kartmy.com
Ready to use reel projects edius available in wedding projects dongle at best price check it now